A warping trapeze is a great way to go if you want to put on longer warps, perfectly, and all by yourself. It promotes even tension which makes beaming easier and, as a result, builds in better tension throughout the whole weaving process. If you have a “springy”warp such as linen or the hemp in these photos, it keeps that tension on the warp at all times which helps prevent snarls.
When done, all these pieces come off the loom easily and store away in my guest room closet. Since looms are built differently from each other, your loom may not be able to set up a trapeze exactly like I did. But with some thought and experimentation, I’m sure you can figure out a way to make one work for you.
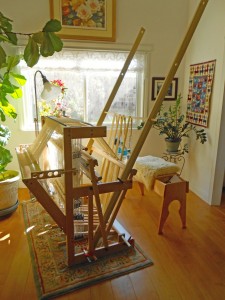
Angel Wings trapeze
The trapeze in the photo consists of:
* 2 1×2’s [mine are poplar] 8 feet long,
* 4 clamps,
* a very smooth rod [wooden dowel or pipe or metal rod]
* another rod and supports for the bottom of the loom [explained further]
In this method you beam the warp from the front of the loom. It needs to either go through a fine raddle which can sit on top of the loom if possible, if not , in the area where your reed would normally go. The idea is to spread the warp out evenly.
The lease sticks go thru the cross above the warp beam – here mounted thru the Purrington Loom Angel Wings on the back of my loom.
Each of the 8 foot trapeze frames are clamped to the loom and the smooth rod is inserted through holes drilled in the frame. I have several holes for shorter warps such as this short 4 yard warp in these photos.
In another photo you see the bottom rod in its supports clamped to the frame of my loom. I wanted this rod there so that the warp can travel down from the trapeze, under this rod, up and over the breast beam and then through the raddle. It simply makes the distance longer for those longer warps. It’s not really needed for this short warp, but I wanted to show how a longer warp would travel. The supports for the rod are about 8 inch long pieces of a 1 x 2 with a hole drilled to accept the rod.
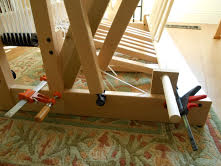
This bottom rod sits in small pieces of wood which, in turn, are also clamped to the side of the loom
Weights are attached to the bouts of warp. I like smaller bouts of warp spaced out, but many weavers will just use one or two bigger bouts with heavier weights. I think it all depends on how wide your warp is, what your fiber is and what simply works best for you after you experiment. Determine how much weight you need by how easy it is to beam. If it’s too hard to turn your warp beam, you have too much weight. This fine hemp needed very little weight to hold it tight and still allow it to beam on easily. Its important that all your weights are the same weight. Water bottles, marbles and a scale make it easy.
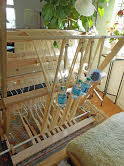
warp weights
To Beam
Keeping your cross still tied in place as it came off your warping board or mill:
* secure the warp to the back beam
* drape the warp bouts over the loom and the trapeze
* add the weights to keep the warp secure
Now that there is tension on the warp:
* insert the lease sticks into the cross and secure the sticks as you normally do
* remove the ties holding the cross in place
* divide the warp onto your raddle
* adjust the amount of weight you need and begin beaming
As your warp gets shorter, you do need to readjust where the warp is because it will eventually be too short to stay on the trapeze. If you have a really long warp, your weights will not be at the end, but somewhere in between. I simply tie the weight on with a heavy, soft cotton cord.
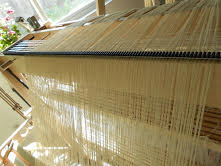
even warp
The last photo shows my fine hemp warp evenly beamed on. The raddle on my loom is permanently attached at the top of my countermarch loom and has, roughly, five spaces per inch . Why five? Its metric.
So this has just been the beaming part. Now you are ready to thread the heddles, tie onto the breast beam and weave off your beautifully beamed warp.
*****
Vilija learned to weave in order to get a job as a “first person, historical interpreter” at Conner Prairie Living History Museum [now Conner Prairie Interactive History Park] in Fishers, Indiana. Interpreters took on family positions in a small, authentically reconstructed community of 1836 and demonstrated and explained how people lived their daily lives back then. “Weaving, and later spinning, became not only the best part of my job but also my everyday life. Both these wonderful crafts still continue to occupy much of my time and interest, and probably will until I can no longer throw that shuttle.” You can contact her at: vilijad(at)me.com.