Blue dyes were rare in the millennia before chemical dyes were invented. Northern European dyers used woad (isatis tinctoria), a member of the cabbage family, and in tropical climates there are several species of indigo. Indigofera. tinctorium is from India, Lonchocarpus cyanens lives in Africa, and there are two or three others from the New World and the Asian subcontinent, all of which are generally bushy perennial plants. This is the crop which is fermented from the fresh leaves and processed into chunks or powder for sale to dyers world wide.
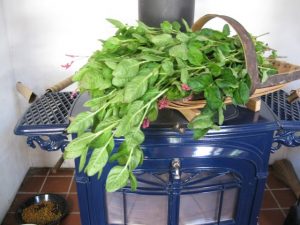
A bouquet of Indigo
The species I grow and use is Japanese indigo, Polygonum Tinctorium, also known as knotweed, an annual in the buckwheat family. In Japan, the plants grow in sprawling clumps of leafy stems which are cut several times a summer and laid out to dry. The leaves are removed and saved in burlap bags until the winter, when they are piled in heaps on the clay floor of the fermenting house and sprinkled with water so they can ferment. The piles are turned frequently until the heap is reduced to a sticky blue mass which is formed into balls to dry. This is sold, like the Indian or African variety, to dyers.
It is also possible to use the leaves without composting, cooking them slowly to release the indigotin, straining out the leaves and then adding an alkali, baking soda, aerating the liquid, and adding hydrosulfite. This is a simpler, faster process, yielding a single-use dye pot, unlike the long-lived dye vat which is possible from powdered indigo and lye.
And it is possible to use the leaves fresh from the plant, pounding between folds of cotton cloth with a mallet to make green prints, which, when exposed to air, will turn blue and be somewhat permanent.
An even more exotic process is to stuff fresh leaves into a blender and whirl them with a small amount of water to make an indigo smoothie. If pieces of silk are immersed into this sludge, they emerge a startling turquoise shade, which seems to be wash and light fast.
Growing Japanese indigo in Sonoma County starts in the fall. I dig the old stems from last years crop into the beds where I plan to plant next year’s crop, along with a good amount of compost. I currently have three strains of the plant, from different seed sources. My main crop came from seeds from Dorothy Miller and has roundish leaves with bright pink blossoms. It is very vigorous, sending up many sprawling branches from each plant, and rooting wherever the stems lie on the ground. They rarely reseed in my garden. The first year I had eleven huge plants, and let them all go to seed, and I found only eight wee plants in the bed the next summer. That fall I carefully saved a big bag of seeds, and started growing them in flats indoors early the next year.
Last year I acquired some plants from Melissa Larson, who bought her plants from Fibershed. They have longer more pointed leaves and are much taller plants, with pale pink blossoms. These had thickly re-seeded from her crop from the year before.
Also last year I got some seeds from a white-blossomed variety at the Fibershed fashion show, and grew about a dozen plants to build up a seed supply. This variety produced very short plants with much smaller flowers, and more dainty pointed leaves.
As I did not have enough plants of any variety last summer to harvest leaves for dyeing, I just concentrated on producing enough seeds to save for the next planting. The fall before last I had not picked the seeds until after the first frost, and none of them were viable. I think the birds eat a lot of the seeds, which ripen sequentially, and fall to the ground if the blossoms are not picked before they fade. I also discovered to my dismay that the seeds have a very short shelf life. In spite of being stored carefully, they did not remain viable longer than from the fall to the spring. By the next spring, they were useless.
Rowland Rickets gave a talk and slide show in Point Reyes for Fibershed several years ago. He lived for quite some time in Japan, working for an Indigo farmer, growing, harvesting and processing indigo in the traditional way. He teaches at the University of Indiana, growing indigo in his front yard and on the farm for the university.
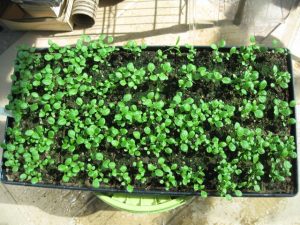
I now use his method of starting indigo seedlings as I have had success with it. He starts his seeds in the ground in an outdoor green house, but as I do not have that set-up, I use flats in my solarium. I use a rich potting soil, and spread the seeds thickly on top of it, followed by a layer of sand thick enough to cover the seeds. The sand keeps the seeds from being dislodged when I water, and also acts as a mulch. I water everyday, sometimes twice, as my solarium heats up quickly when the days are clear and sunny. The seeds come up with in a week or two, and grow tall and leggy while setting deep roots. This is where an in ground bed would be helpful.
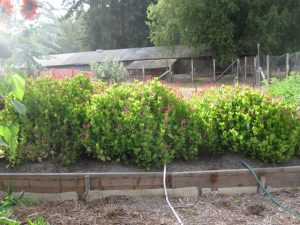
Once the weather warms I turn over the beds and plant out the seedlings, again following Rickets’ directions. I plant the leggy seedlings in clumps of 6 or so, on their sides, in moderately deep furrows, covering them up to their leafy tops, so they will root at nodes along the stems. I plant them along soaker hoses laid up and down the beds, and cover everything with a thick layer of mulch. Indigo likes a lot of water, I think it’s because it has had, at least in my garden, relatively short roots. I hope this year to plant it early enough that it can get a good start and develop deeper roots, and not need watering so often.
The plants will grow thickly, sending up many leafy stems that stand eighteen to twenty-four inches tall. It is possible to cut two or even three crops from a plant during a summer. Harvesting begins when a bruised leaf shows blue. I plan to have a crew of helpers on the day I pick, because the process is very labor intensive. I try to cut the stems very early in the morning, and get the leaves stripped off before it gets hot. This job is best done indoors or at least in the shade, because the leaves wilt quickly in the sun, and wilted leaves seem to give less color. Everyone ends up with blue thumbs.
Rebecca Burgess says to stuff a pound or more of the leaves tightly into a gallon sized glass jar, fill it with hot water and heat that jar inside a big metal pot–a giant double boiler or Bain Mairie. The aim is to bring the water and the leaves to 160 degrees F and hold it there for a two or three hours, until the liquid in the jar turns a pinky brown color, with a coppery metallic sheen to the top of the water. Do not let the temperature get above 160 degrees F, or the indigo will be ruined. After breaking a couple of big jars, I have started just putting the leaves into a stainless steel pot (un-chipped enamel would also work, but not aluminum or iron or copper). I am also going to experiment next summer with cooking the whole branches, eliminating the time consuming leaf stripping, but it’s harder to judge the weight of the leaves that way, and the recipe does depend on knowing that there is a pound of leaves in every batch. The stems are reddish and contain no indigo at all.
After the right color is achieved, pour the liquor off, into a bowl or a bucket, and squeeze the leaves out. They can be saved to recook with fresh water for a pinkish dye on mordanted wool.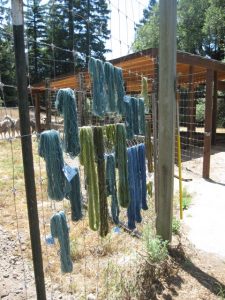
To the indigo liquor, add a tablespoon of baking soda, and begin to aerate the liquid, by pouring it back and forth from one vessel to another, or by beating with an electric beater. I use a submersible wand beater held just below the surface of the liquid. A white foam will form, and will gradually turn blue. Keep beating or pouring until it stops getting more deeply blue, let it set for a few minutes until the foam subsides, then carefully sprinkle one tablespoon of Rit color remover (hydrosulfite, or spectralite) over the surface of the dye-bath and stir very gently. Use a mask to avoid the fumes. Cover, and keep the container warm for about an hour, until the color of the liquid turns yellow, or at least yellow-ish green. If it’s still blue, add a bit more Rit, and wait 20-30 minutes. Do not agitate. You want to avoid introducing oxygen into the dye-bath.
Once you see the color is yellowish, you can enter skeins or pieces of fabric. Wool or silk or cotton will all work. One pound of fresh leaves will dye about five ounces of wool yarn, less of cotton. No mordant is required, but all the fiber must be very clean, well soaked, and as hot as possible, so as not to cool down the dye-bath. Squeeze out excess hot water, and slowly submerge the skeins or pieces of fabric into the pot. Gently move it around under the surface, before letting go. Fabric that is folded may show marks, resists, where it overlaps; re-dipping will even out the color a bit. Leave the fiber in the pot for 20 minutes. Unlike a long-life indigo vat, there is no layer of organic sludge in the bottom of the bucket or pot, so it is possible to leave the fibers soaking in the pot for some time, without fear of them being discolored by contact with the sludge. Remove them by squeezing against the side of the pot right at the waterline while you draw them out, without splashing dye back into the dye-bath. Squeeze the fiber again over a drip pan.
Traditional instructions told us to hang the wet skeins to oxidize for 20 minutes before re-dipping, for a deeper color, and most also say that two dips at a minimum are needed to be colorfast. However, with this long soak, most of the indigo is used up in the first dip, and very little is to be gained by dipping a second time, unless it is to even out fold resists in fabric. If the leaves have been particularly strong, you may be able to dye more than five ounces. Keep on dipping until you cease to get color. Some dyers put a handful of paper or wool into the pot and leave it overnight, to completely exhaust the dye-bath. Stir in a glug of vinegar to balance the alkali, and pour the exhausted bath down the drain, or on the compost pile.
To avoid the problem of blue crocking off yarn or fabric after washing and drying, Rickets and some other dyers. recommend oxidizing in water, which is as effective as doing it in the air (water is H2O, after all), and removes the stuck-on but not bonded indigo molecules—the ones that are so hard to wash off after the yarn has dried. Some add hydrogen peroxide to speed up the oxidizing.
To neutralize the alkalinity in the fibers, rinse the fiber in a bath of warm water with a glug of vinegar, let it sit for 20 minutes, then wash with a mild dish soap (Dawn), rinse until the water runs clear, and hang to dry.
These notes were gleaned from a variety of sources: Rita Buchanan’s two books on dye gardens, Jenny Dean’s many about using natural dyes, Rebecca Burgess’ handbook on north American dye plants, Jim Liles’ collection of traditional dye recipes updated for modern use, and Rowland Ricketts’ directions for cultivation. I recommend all of them for additional information and inspiration.