I am fascinated by weave structure and have been experimenting with structures and threads from the beginning. Given that, most of my ruffles and textured pieces are plain weave. However, it’s the threads that are what drove me to makes all these pieces.
Ruffles
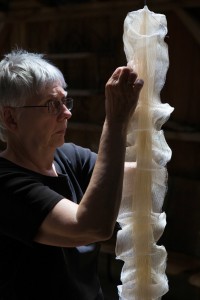
Peggy with ruffles
The ruffles “came” to me when I was working on weaving sheer wall pieces. The thread is very fine and highly overtwisted so it can kink if you don’t keep it under tension.
The threads are on spools probably used in industry. Lillian Whipple told me about them years ago. On the spools the colors of the thread are outrageously gaudy—chartreuse, bright orange, pink, green. The dyes are fugitive which means by time I am measuring out the warp they are almost colorless—I say honey color. This is because the different colored threads represent the different types of threads and at the mill, one would need to know whether a fine thread is S or Z twist or just strands (not twisted). When I made my first warp to try the mysteriously colored threads, I decided I’d just make it 2 or 3 yards long and as wide as I had time for that afternoon. I ended up with enough threads for a warp 5” wide. All the rest of my sheer-cloth warps have been 5” too.
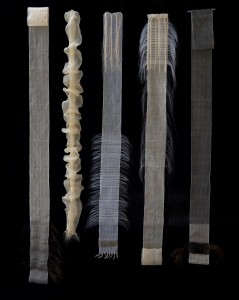
Veils
At first I made what I called veils—sheer pieces, 5” wide and fairly long—just to see if I could make a sheer cloth. There are about 100 threads per inch. Soon I wanted to see if I could be successful with half that number—I made two layers instead of just one—so there were only 50 threads per inch per layer. That made the cloth more transparent. I wove the two layers as a tube just because that was the easiest way to do it since a tube requires only one shuttle.
The next thing that interested me was to try to make moiré.
The first ruffle
I’d seen at an exhibit, two sheer cloths hanging close together, one in front of the other and the moiré or water-mark designs were all over the cloth when you looked at them from one side. So, since I had two layers close together I thought I should get moiré. Well, I barely did if you looked at the cloth just right. The typical patterning just didn’t show up. So I thought if the layers were separated just a bit, perhaps that would work and I began to turn the tube inside-out. As I was doing that, the cloth ruched or ruffled up on my arm. I thought that looked really interesting so I stopped and never turned it completely inside out—just left the tube ruffled up. That was my first ruffle—an accident stemming from an experiment. I still didn’t have moiré, yet.
Moire
Moire
While weaving the veils—all tubes—I’d forgotten all about the moiré question until one day I thought about using a
black weft. Voila! Moire appeared just as clear as one could hope for. I had the perfect combination of two layers close together and a contrasting thread for the pattern to show up. In the photo of the veils it’s the one on the right but it doesn’t show up because of the black background. See the detail for what it really looked like.
I’ve been trying moiré again, thinking I could control the patterning a bit with the way I beat in the weft. I am using the same threads, and the same layers, but the patterns haven’t shown up except if you look at it cross eyed or wave the cloth a certain way. It’s maddening.
Textured Pieces
I like to control or predict what an outcome will be and that’s a part of my experimentation. In the textured pieces, I used different weave structures that I had learned exaggerated the puckering more or inhibited it and played with the idea of placing more or less puckering at different places.
The puckering comes from using overtwisted thread and weaving it open, like cheese cloth. Then the cloth is put in water and that makes the threads swell and move around and pucker the cloth.
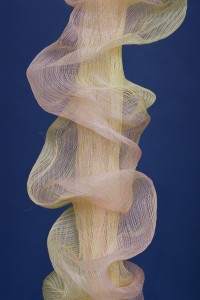
I used some threads that didn’t collapse or pucker along with the overtwisted ones. When the overtwisted ones shrank, the regular threads (in this case, sewing thread) had to go along for the ride and pucker or ruffle up.See the photograph of “Pink Creature.”
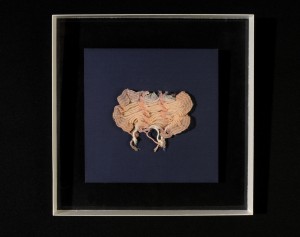
Pink Creature
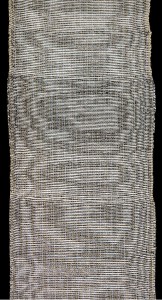
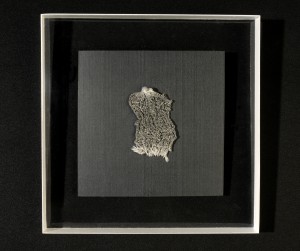
The piece, “Checkerboard”, was woven with different weave structures as well as with overtwisted threads of different twist. The gauze-like photo is what the cloth looked like before it was washed and became a checkerboard. Figure 7. The different appearances in the checker board came from twill weaves that collapse more and plain weave and an open weave that happened once in an experiment.

Checkerboard (unwashed)
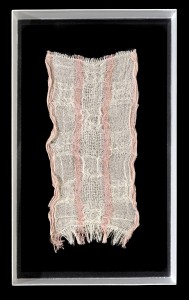
Checkerboard
A few pieces are called “Chemise”. . They were the results from experimenting with different wefts on the same warp—a fine, single ply wool thread that is highly overtwisted. Usually I weave a heading at the ends of an overtwisted cloth to prevent the twist from escaping. I left the headings in on one of them since it greatly influenced the shrinkage of the piece – it inhibited the shrinkage.
Chemise #4 overtwisted wool, silk.4″x3″
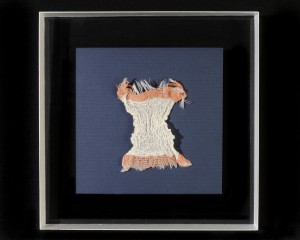
Chemise #2 overtwisted wool, cotton. 6″x5″
Mounting the Pieces
Before my little pieces are mounted they look almost like scraps. When they are mounted, I think they look like art. I volunteered in the textile department of the Cooper-Hewitt Museum (now part of the Smithsonian) when I lived in New York and looked at hundreds of fragments of old fabrics. Almost all of them looked wonderful as small pieces in themselves when they were laid out on tissue paper. That’s how I came to the idea of mounting my small pieces. To me, they looked complete and interesting enough as they were: small, fragment-like textiles that were worth taking a good look at.
A framer in New York devised the mounting I use. I like having clear plexiglass on the back as well as the front. He mounts the textiles in plexi boxes that have some depth so the pieces seem to float in space. The depth of the boxes is about 1” to 1 ½”. What makes these boxes unique is the thinness of the plexi he uses. I tried to have similar ones made here in Marin County and no one seems to be able to glue thin pieces like he can.
Summary: My Creative Process
When I’m creating I am usually experimenting. I rarely repeat something. The exception is the ruffles. I’ve made several now and have ideas for more to come. I start with a problem or something to achieve. It may be something I’ve read or heard about, for example: I wanted to make moiré, crepe, wavy wefts, and sheer cloth. It may be a special yarn (more likely a fine thread) and/or a weave structure—the veils, ruffles, and textured pieces, for example.
I’m experimenting now and am frustrated that nothing pleases me—yet. I’ve begun to wash the experiments and am finding they are more interesting than I thought. It’s risky and fun/not fun at this stage. It’s more fun when an idea works out and I like the result. Then I wonder how I ever did it.
Peggy Osterkamp is a weaver, an artist, a teacher, a writer and a scholar in the field of textiles. She studied at Pacific Basin School of Textile Arts in Berkeley and apprenticed with Jim Ahrens, designer of AVL production and dobby looms. She has published four books and a DVD about the techniques of weaving and taught at City College of San Francisco for many years. She has lectured at museums and given semester length courses and workshops across the country. She has also done textile research at the Cooper-Hewitt Museum and Smithsonian’s National Museum of Design. Her art pieces have been shown in galleries across the country and internationally. Peggy is currently based in Greenbrae, California.