AVL introduced the Warping Wheel at the 2000 CNCH conference in Santa Clara; fifteen years and one redesign later it is still going strong. Back in 2000, weavers wandering by the AVL booth were fascinated and a little puzzled by this interesting new gadget, but a few minutes into the demonstration the penny dropped and they began queuing up to order one for themselves. These weavers were captivated by the idea of a tool that would let them beam a warp in sections without all the fuss of calculating yarn length, winding spools, loading a spool rack and threading a tension box.
Traditional sectional warping is undeniably the best way to put on a very long or very wide warp. Unfortunately, it requires lots of equipment; winding spools can take hours and it isn’t very flexible when it comes to changing colors. On the positive side, it is possible for one person to beam a perfectly tensioned warp of almost any length or width.
Sectional warping with the AVL Warping Wheel doesn’t require winding spools; in fact you can use a single cone of yarn. It is quick and easy to change colors and warps of up to 24 yards can be beamed under firm tension for trouble-free weaving.
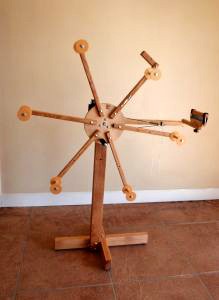
AVL Sectional Warping Wheel
FIRST, A FEW SECTIONAL WARPING GUIDELINES
All sections should be the same length and have the same number of ends.
Each section should be wound on the beam in flat, firm layers that extend the full width of the section.
Sections should contain close to the same number of ends per unit as they will be sleyed; they do not have to be exactly the same. For example, a sett of 24 epi in the reed could be beamed at anything from 20 to 28 epi on the sectional beam.
Bouts must be at least as wide as the section; you can make a bout narrower but not wider.
Tension should be as firm as possible and be the same for all bouts.
A QUICK LOOK AT USING THE AVL WARPING WHEEL FOR SECTIONAL WARPING
Step 1: Warp Length ~ This is the part where you use the WW to measure the length of your warp. This is very similar to using a warping board or warping reel to wind a warp of a certain length. A variety of lengths can be wound from 2 to 24 yards – some users report beaming warps of over 40 yards!
You use the WARPING WHEEL CIRCUMFERENCE CHART to determine the configuration of the WW for your desired warp length.
For example: To wind a fifteen yard warp, you would set all of the spools to the outer position and put on 5 revolutions for each warp end. (5 revolutions X 3 yards = 15 yards). To wind a 7 yard warp, move 4 spools to the inner position and use 3 revolutions per end, (2 yards 15” x 3 = 7.25 yards, a bit over but close).
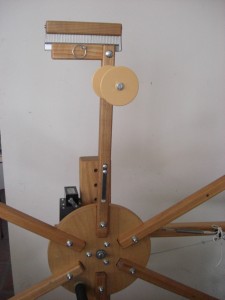
Note the clip where the yarn starts, the spool which the yarn passes over and the mini-raddle (at the top) where yarn ends for each bout
AVL WARPING WHEEL CIRCUMFERENCE CHART:
Arms or Spools in outer position Arms or Spools in inner position Original Wheel Circumference
Outer position Inner position Wheel circumference(WW1)
6 0 3 yards
5 1 2 yards, 26 inches
4 2 2 yards, 22 inches
3 3 2 yards, 18 inches
2 4 2 yards, 12 inches
1 5 2 yards, 6 inches
0 6 2 yards
*Add 24” to the TOTAL WARP LENGTH if you are using WW2, (the one with plastic spools). This is to account for the distance up from catch clip to spool and back down from mini-raddle to clip at the beginning and end of each bout.
Step 2: Calculate the Number of Ends per Section ~ This is different from plain beam warping in that you need to divide your warp into several small bouts with the same number of ends.
You’ll need to calculate how many ends to include in each section. For example, if your sett in the reed will be 24 epi and the sections are 2 inches wide, you might need 48 ends in each bout. But keep in mind that, if the total number of warp ends needed doesn’t divide equally by the sett, the number of ends per section does not have to be exactly the same as the sett in the reed. For example, a sett of 24 epi in the reed could be beamed at anything from 20 to 28 epi on the sectional beam. The important thing is that each section contains the same number of ends.
Step 3: Beaming the Bout ~ This is where the WW functions like a tension box to allow all of the bouts to be beamed under the same, firm tension and fill the sections from side to side.
Once you have wound the number of ends needed for one section onto the wheel, it is time to transfer it to the warp beam. The adjustable tension and pivoting mini-raddle makes it easy to beam flat, firm layers that completely fill the section width as shown below.
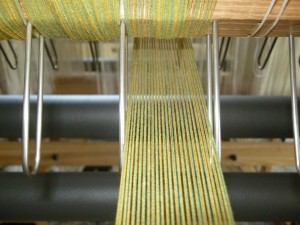
Winding the section on in a flat layer
Repeat winding and beaming bouts until you have beamed the number of ends called for in your weaving draft.
I hope this very brief overview of sectional warping and using the AVL Warping Wheel has sparked an interest in learning more about sectional warping. For a more complete understanding of sectional warping and if it might be right for you, I recommend the following resources:
Peggy Osterkamp’s book, Warping Your Loom & Tying On New Warps, for a comprehensive explanation of sectional warping.
My YouTube video for a demonstration of using the AVL Warping Wheel for sectional warping.
The monograph, The AVL Warping Wheel for Sectional Warping; created in collaboration with Peggy Osterkamp. To order, contact me at jannietaylor1@gmail.com. Price is $10.00 + $2.50 postage.
Jannie Taylor, of San Luis Obispo, California, teaches advanced weaving classes at the AVL Weaving School and structure based workshops for guilds and conferences including Convergence 2008, 2010, 2012 and 2014.
When she’s not teaching, Jannie enjoys designing and weaving one-of-a-kind garments and fashion accessories. She is very active in her guild, the Central Coast Weavers, where she facilitates a large study group and chairs the steering committee for their very successful annual sale.
On weaving, she says, “Sitting at my loom, throwing the shuttle and watching the amazing process of threads being interlaced into a textile that began as an idea in my head is still, after all these years, a joyful and amazing experience.”