Marlene learned to weave over thirty years ago at the City College of SF classes which were held at Ft. Mason. Most of that time she wove on 4 – 8 shafts. After retiring 10 years ago, she “graduated”, first to a 16 shaft loom and then to a 24 shaft loom.
First you need to plan and weave the yardage. Then you can sew it. When I start a project I usually have a goal in mind such as to exhibit at a conference or to enter a fashion show. I look through my stash of yarns to see if I have a group of yarns that work together. Then I look through clippings from newspapers and magazines and drawings I have accumulated. When I find a good design idea, I go back to the yarns and see if I have any that are appropriate. If not, I then go to the Internet and look for suitable yarns. I do try to work with my stash though.
The next step is looking for a weave structure. Some of the structures that I have used successfully for a garment are plain weave with thick and thin wefts, twills (point twill, advancing twill, networked twill), log cabin, bumberet, shadow weave, Bateman weaves (multiple tabby, Bateman blend), and huck lace. The choice of yarn and sett are vital to producing a good fabric for sewing. You don’t want it hard as a board or too sleazy. That dreaded word “sample” must be used!
I take sampling seriously, to the point that I will weave two warps. My preference is to weave fabric with color variety in the warp and then have a one shuttle weave. So for the sample warp, the weft yarn becomes a warp yarn and I can test color combinations with weft. The draft must be turned for this exercise. I use weaving software to do this. After weaving the samples, I cut them off the loom, wash, dry and press before I make my decision. The wet finishing is important so you can see how the colors look when finished. You also can see if the sett is appropriate and how much shrinkage occurs. Essentially the picks per inch in the sample become the ends per inch in your fabric.
Once I choose the colors that work well, I will then design the warp with those colors and return to the original draft with the various colors in the warp. Once you have decided on what fabric you will weave, a decision must be made on width and length of the fabric. The first consideration is how wide is your loom? Commercial fabric comes in 36”, 45” and 60” widths. You do not need to weave to those measurements. Pick out a commercial pattern or draft your own. Then measure the widest pattern piece, add the shrinkage amount and you’ll see how wide you need to weave.
Next, figure out how much to weave. Make a diagram of the yardage with each pattern piece placed on it. Your yardage will be a single layer so don’t forget that you need to flip the pattern pieces for sleeves, fronts and backs (if there is a center back seam). For most projects I weave yardage about 30” wide and 5 – 6 yards long. I always add from ½ – 1 yard to my calculations just in case of mistakes in either the weaving or my arithmetic!

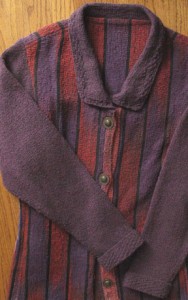
Handwoven jacket with knit sleeves and collar
After making all these decisions and the weaving and finishing of the yardage, comes the cutting and sewing. Maybe you are concerned that once cut, the fabric will ravel out of control. An easy solution is to fuse the entire yardage with interfacing prior to cutting out the pattern. Examples are Easy-Knit fusible tricot, Fusi-Knit fusible tricot, Pellon Sof-Shape fusible, Pellon Sheer Knit Interfacing and Pellon fusible sheer blender interfacing. Take your yardage to a fabric store and drape the fabric over the interfacing, checking for weight and hand. I suggest that you buy several likely candidates. Then you can fuse a small piece to your fabric and again check for how the fabric moves. The result should be a more stable fabric but no stiffness.

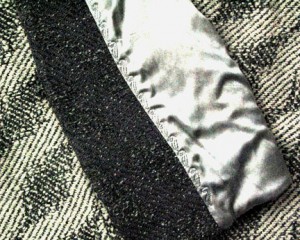
silk cotton lining with understitching
You might want to also stabilize the edges of each cut piece with a straight stitch, zigzag or overlock with a serger as soon as the pattern piece is cut out and before constructing the garment. I also would recommend that you finish each seam with a seam treatment such as zigzag or overlock, or bindings such as bias fabric, sheer seam or Hong Kong finish. You want to prevent the fabric from fraying as the garment is worn. The inside of the garment will look neater and more finished.

Bound buttonhole

Buttonhole in seam
Closures are another area of concern. A simple solution is to sew a button on the outside and close the garment with a snap.
You can also make a button loop using a purchased cord or cord that you have made. Bound buttonholes are a distinctive solution. I recommend using commercial fabric for the lips of the button hole. In the example of bound buttonholes, I fused an interfacing to the knit fabric that was a good color match to the handwoven. It stabilized the knit enough to make the buttonhole lips serviceable.
An example of a stable buttonhole for handwoven yardage which doesn’t require that you cut into the fabric is a buttonhole in a seam. In this example a seam was sewn a short distance from the edge of the front of the garment, leaving openings for each buttonhole. A matching seam was made on the front facing. The edges of each opening in the garment and the facing are handsewn together. You must plan ahead for this style of buttonhole, leaving seam allowances for the buttonhole seams.
A test garment or “muslin” is highly recommended, using an old sheet or a remnant that is about the weight of your handwoven yardage. There is no need to make a finished garment. But both the style and fit of the garment can be tested before you cut into your handwoven yardage. You can also test seam finishes, hems and buttonholes to see if they are appropriate for this particular yardage.

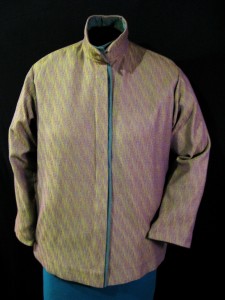
Jacket accepted for the 2010 Convergence Fashion Show

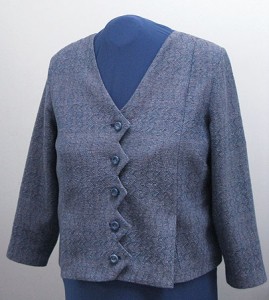
Zigzg jacket in the 2010 CNCH Fashion Show
If you are unsure of techniques, there are many good books that can guide you. Examples are Taunton Press, Inc. and The New Complete Guide to Sewing, Reader’s Digest. Threads magazine and their online forum along with their fairly new publication SewStylish are also good resources. Sewing classes are also offered at many fabric stores and even on the Internet.
So plan ahead and sew with care. And enter your garment in the CNCH 2012 Fashion Show!
For more info, click on CONFERENCE 2012 .