Nowadays fiber artists use many surface design techniques to produce patterned fabrics. Fiber reactive dyes, paints, discharging techniques, silk screening and shibori are commonly understood by most artists and their customers. I am the happy practitioner of a much less well known process, the art of Japanese stencil dyeing, known as katazome. This is an ancient art in Japan, practiced for hundreds of years. Originally made for summer kimono or yukata, or for futon covers and other household purposes, these fabrics were dyed in indigo. Typically they are repeat patterns, often of great delicacy. Before the advent of synthetic dyes all fabrics in Japan were produced using natural dyes or mineral pigments with a binder of soy milk. Even now, although synthetic dyes are the norm for katazome in the dyer’s workshops of Tokyo and Kyoto, the Okinawans continue to use the old techniques to produce their own form of katazome, called bingata. It is this process, using natural dyes and pigments, that has become my passion.
I began using katazome twenty one years ago, when I had the good fortune to take a local workshop given by a Japanese indigo dyer. He taught us to cut a stencil and I knew from that moment that this was what I was meant to do. I studied early on with John Marshall, the American katazome master, but I have been finding my own voice as a katazome artist for the past eighteen years. Although my Japanese friends assume this is something only the experts can do, in fact the technique is not too difficult for an average quilter to master. It is not limited to traditional indigos. It can be used in a fairly easy one-step process to produce multicolored cottons, linens and silks, using a variety of fabric dyes and textile paints. By protecting dyed areas with paste and layering other stencils, fabrics of increasing complexity can be produced. It can be used to dye warp threads for weaving. Or stencil dyed images can be combined with other techniques to produce fabrics of great depth and beauty. It is a hugely versatile technique for the limited production of patterned fabrics at home, without fancy equipment or bulky machinery. There is virtually no fabric I can imagine that I cannot produce myself. I am frankly astonished that is not known and used by many more artists.
The term katazome is made up of two Japanese words, kata – pattern and zome – dyeing. The fabric design is made with a rice paste resist (nori), applied by means of a paper stencil. Once the paste is dry the fabric can be dyed or painted. Washing off the resist reveals the protected fabric underneath. In this way it is rather like batik, but the rice paste is much less toxic and troublesome to remove than wax. The stencils are called katagami (pattern paper). Although the dyers usually did not keep their worn stencils, enough of them have been preserved by collectors to reveal the amazing virtuosity of the Japanese stencil carvers. Indeed it was a book of antique stencil patterns, bought years ago, which fueled my desire to master this ancient craft and produce fabrics for my own use as an art quilter and surface designer.
The stencil making process starts with a handmade Japanese paper called shibugami. This paper is made from two or three layers of thin white kozo (mulberry fiber) paper, laminated with fermented persimmon juice (kakishibu). The persimmon tannins strengthen and waterproof the paper just as tanning preserves leather. It is chestnut brown in color and brittle when it is dry so it is easy to cut into even very delicate patterns. It comes in sheets that are 22” x 36”. Typical stencils from traditional Japanese patterns are 11” x 17”, so a sheet of paper can generate four stencils. The image can be drawn on the paper, photocopied on it or, for larger stencils, printed onto sheets of tracing paper, which is attached with spray adhesive. An X-acto knife and a soft vinyl mat are all that is needed to cut a stencil. The Japanese also make small hollow punches to cut fine dots of various sizes. Once it is cut, a layer of silk mesh is attached to the top of the stencil. This holds all the little parts together and makes the stencil strong enough to stand up to repeated use. It also allows extremely fine patterns. The Japanese use a lacquer product to attach the silk, but latex gloss enamel works well. One of the beauties of these paper stencils, as opposed to plastic stencils, is that by carefully removing paper connectors, called bridges, left when the stencil is cut, it is possible to float elements on the silk.
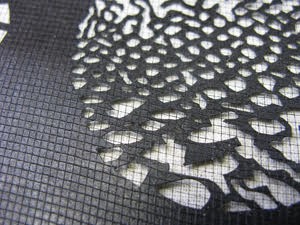
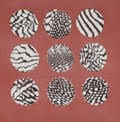
Prepared stencil
Before a stencil is used it is soaked in water, and the brittle paper becomes leathery and waterproof. It clings to the fabric, unlike plastic stencils, making the rice paste much less likely to creep underneath. The nori paste itself is made from sticky rice flour, rice bran and water. The rice bran, a byproduct of polished white rice, is finely milled just for dyeing, and serves to reduce the stickiness of the cooked rice flour, which otherwise would be difficult to handle and to remove from the fabric. The resulting dough is formed into small balls or donut shapes and steamed, wrapped in a damp cloth, for half an hour (or cooked in the microwave oven). The uncooked dough is a pale pasty tan, with a slightly gritty texture.
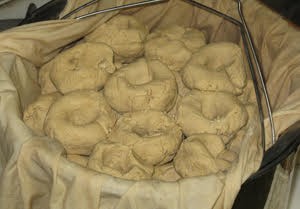
The uncooked paste
Cooked paste looks like warm peanut butter, smells like brown rice and is elastic and velvety smooth – not a toxic product. I can safely use my kitchen equipment to make the paste, in batches ranging from ½ cup to two quarts. Glycerin is added to keep the dry paste from cracking and calcium hydroxide to preserve and strengthen it.
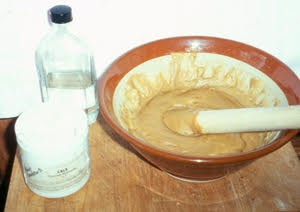
The cooked paste ready to use
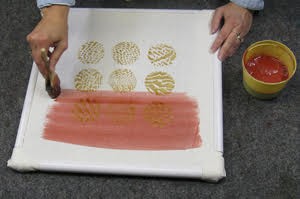
To apply the resist paste the fabric is laid on a firm, or very slightly padded surface. A springy print table is too soft. The Japanese still attach their fabric to long boards, which makes for absolute precision when pasting matching repeats, but it is not practical for a home studio, and unnecessary for pieces where one is composing freely with several stencils. The finished nori is spread through the stencil with a spatula and allowed to dry.
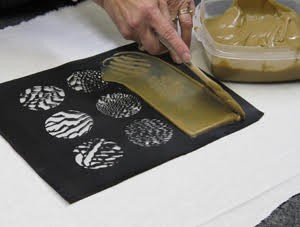
Applying the paste
If the piece is to be painted later, it is best to stretch the fabric while the paste dries so it stays smooth. For small pieces, simple frames made from 1/2” PVC pipe and big binder clips are suitable. If larger pieces are being made, the Japanese system of end clamps, called harite, with side-to-side bamboo stretchers called shinshi is ideal. Shinshi are sometimes tricky to find outside of Japan, but they are not impossible to get, and this system allows me to paste and dye very long lengths of fabric (8 to 10 yards) or fabrics as wide as 60”, which is wonderful for whole cloth quilt tops
The dry paste is durable enough to be dipped into an indigo vat for a minute or two without dissolving. Since indigo requires repeated dips to build up stable deep blues it must dry between dips Even the tiniest details remain crisp and clear. When the paste is soaked off, it is just magical to watch the pattern appear. This resist paste is not durable enough for other vat dyes, with their longer immersion times. But pasted and stretched fabric can be painted with any dye that can be thickened enough not to soak under the resist paste.
painting with the thickened dye
Thickened fiber reactive dyes, acid or direct dyes, Setacolor transparent textile paint and watercolor pigments mixed in fresh soy milk are all equally successful. I have grown accustomed to the soy based pigment dyes and use them almost exclusively. Dry soybeans, soaked overnight in water, are blended with water and strained through a cloth to make a liquid that is approximately the consistency of 2% milk. The fabric is pretreated with a layer of the soy milk, to size it, which improves the binding of the dyes and reduces the likelihood of color bleeding under the paste.
The powdered pigments are stirred into the soy milk and applied to the fabric with soft Japanese brushes, taking care not to flood the fabric with too much dye, and working the color well into the weave of the fabric before the paste starts to soften. Often the background is dyed first, and then the darker detail colors are added later.

Adding details
With these pigment dyes I can work the color on the fabric, blending, feathering and shading to develop perfect graded transitions between one color and the next. The colors are transparent and additive. After the first colors are applied and the paste is allowed to dry I can go back and add subtle shading, change the color slightly by adding a different color on top, or cover areas with plain paste to protect them before dyeing the background a competing color. Sometimes as many as ten different pasting and dyeing steps are made before the fabric is finished.
The finished fabric
The dyed fabrics need to cure for a few days before the paste is soaked off, to give the soy proteins time to denature and attach the colors well. They are not as wash fast as fiber reactive dyes, but for art quilts and art garments they are lightfast and durable. They work very well on silks of any weight, linens, and natural fiber blends.
When I first started katazome I cut many, many stencils using the wealth of copyright free sources for traditional Japanese patterns. I love stencil cutting, the feel of the paper and the rhythm of the knife, the meditative quality of the process. As I became more technically proficient I began to look at the world differently, seeing pattern everywhere I went. My own work now bears little resemblance to the traditional Japanese patterns, but the respect that the Japanese stencil designers had for the natural world parallels my own, based on a career as a marine biologist. From bare trees and skeleton leaves to starfish to the delicate abstractions produced by natural forms, there is nowhere in nature I cannot find inspiration for the work I do.
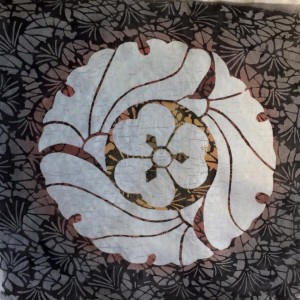
An example of Karen’s work
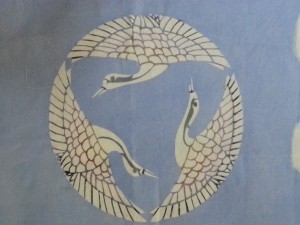
A new student’s first work
Karen Miller was born in Oakland, CA. She was a marine biologist before becoming an expert on katazome, the art of Japanese stencil dyeing. Using her own hand cut stencils to apply a resist paste she produces fabric for art quilts, as well as silk garments, linen hangings and indigo dyed cottons.
She has taught katazome nationally and internationally and published several articles on katazome. She was an invited lecturer at the Museum of International Folk Art, Santa Fe New Mexico. She was accepted to Visions 2002. She was featured on Oregon Art Beat, OPB TV in October 2007.
www.nautilus-fiberarts.com
nautilusfiberarts(at)gmail.com