Tailored from Hand Woven
by Joan Near
Text Message:
To: Maggie
From: Joan
“Mags, I am about to cut into the silk Damask fabric which took me a year to make on the drawloom and I just needed someone to know that.”
To: Joan
From: Maggie
“You got this!”
So, yes, even though I’ve sewn a lot of tailored garments from my precious handwoven cloth, I still need a little support when I go to cut into it!!! This article has some tips and tricks that I’ve learned from my years of experience (read: I’ve made the mistakes so you don’t have to!)
Weaving the yardage
I used to weave my yardage at the width of the widest part of a sleeve. But I found that I was wasting a lot of fabric that way. Now I take a page from Depression and World War Era sewing, and I “piece” my garments. More about that later.
The width I aim for is one half of the back of the garment, plus generous seam allowances on both sides. The length will be four times the length of the back, plus twice the length of the sleeve, plus at least a yard for facings and collar, plus at least a yard for screw-ups. Usually, I’m comfortable with 6.5 yards at 25” finished width for a blazer. I save those thrums! There have been instances where I’ve run out of fabric and had to get creative with the collar! I’ll show you a picture later.
Choosing a pattern
I actually leave the final decisions on a pattern until after the fabric is off the loom and wet-finished. There have been times when my plan for a nice structured jacket have been foiled by a super-drapey finish. And yes, I do sample! I make big-g-g samples! But there are surprises. Flexibility is key. If I’ve woven a relatively “plain” fabric, princess seams on the front are nice because I can do a little shaping through that area, adding visual interest. I find a two-piece sleeve more comfortable and flattering, even though it’s a little trickier to sew. I aim for a pattern without a billion little pieces, but with enough pieces to provide a little shape and structure.
Piecing
As I mentioned, piecing brings much more efficiency to my fabric usage. With scraps from cutting the main pieces, I use seams to add the pointy part of the sleeve to the underarm area. I try to maintain the grainline if possible, or use interfacing if I can’t.
I can piece the undercollar, the facings, and the cuff turn-under by sewing scraps together in the shape of the pattern piece. These areas are not public, after all. The only time I don’t do this is if I’m submitting the garment to be judged!
Working with the fabric
I have a big rule to handle the fabric as little as possible after cutting. Sometimes I serge the edges, but this can distort them, so usually not. I definitely leave the fabric pinned to the pattern piece until the very last minute. Also, I have found that many garments are vastly improved with an underlining. This is not the lining. It’s a layer of cotton batiste or other very light fabric that is cut the same as, and tacked together with, the woven fabric. You then treat this as one pattern piece. This changes the drape (so make sure it’s what you like) and stabilizes the fabric. Yes, you have to take out your big tacking stitches at some point. But the edges of your cut pieces won’t take a beating.
If I make a garment which is not lined, I use a Hong Kong seam to finish. And even on unlined jackets, I tend to line the sleeves. So nice to slip your arm in there without dragging & catching.
A few other tips
- I have wrestled with too-thick fabrics. I now choose very fine yarns for garment-cloth weaving. 20/2 cotton or 40/2 linen are a couple of my go-to’s.
- I do make a muslin, to check the fit; often this helps me with tricky directions as well. It would be more accurate if I used fabrics close in weight to my wovens, but I’m usually too cheap and use an old sheet or whatever is at hand.
- I use a walking foot on my sewing machine.
- I sometimes loosen the foot pressure a tad.
- I reinforce button and buttonhole areas with stiff-ish interfacing on the back of the woven fabric if there is a lining or facing to cover them up.
- I love creating matching closures, either with covered buttons, or inkle-weaving a tie, or other techniques that you won’t find on store-bought.
- I never hurry the process; instead, I enjoy the many months I spend creating each garment.
Now for some illustrations
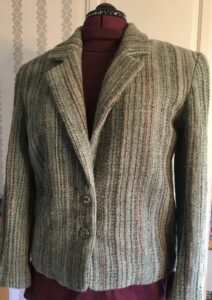 This blazer is “fully loaded,” a completely tailored jacket. Buckram, shoulder pads (it looks football-y here but better on the real model, me) hand-stitching throughout. Whew! This pattern is McCall’s 6172, with lots of additions from a book called “Tailoring: The Classic Guide to Sewing the Perfect Jacket” (2005, Creative Publishing International) Perfect, it isn’t, but I learned a lot. Including to choose a lighter-weight lining for the next one!
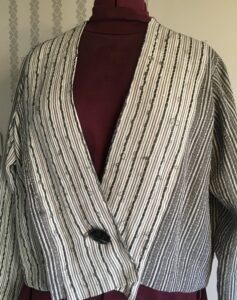 This jacket is made from two different fabrics, both woven with 40/2 linen, and this was during one of my supplemental warp phases.
 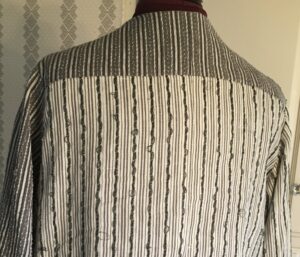 There is a vertical “flange” on one front panel which is in the other fabric, (a little hard to see) and this is how I try to balance the look when using quite different colors. The pattern is Lois Ericson’s “In the Studio 7”, model B. I lined this with hand-dyed linen, but I must have run out because the sleeves are unlined! Exceptions prove the rules!
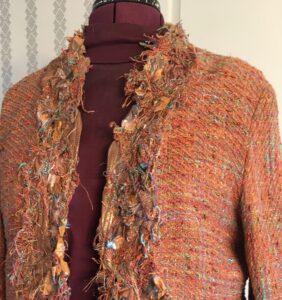 This jacket is one of my first attempts. This is the jacket I referred to earlier, where I ran out of fabric (completely!!) and used Solvy to create a collar with thrums, plus ribbon from my stash. Not for everyone, but it worked for me at the time. The pattern is Loes Hinse #5106 “Bolero Jacket.” Incidentally, when I modeled it for one of my guilds, a member said to me, “I can teach you how to sew!” Ha-ha! I tried not to take that personally. But to this day, I don’t sew with a lot of confidence. Probably a good thing, I make fewer mistakes by second-guessing myself.
Here is another Hinse Bolero jacket, this one woven on my drawloom, using 20/2 cotton for the warp and a thin silk as weft. This was a successful attempt, which got recognition at a CNCH conference. I inkle-wove the front closure using the cottons. The unlined jacket has Hong Kong seams, and the sleeves are lined. I love this jacket.
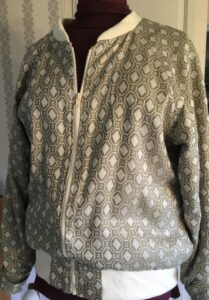
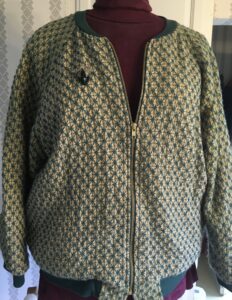 As much as I love blazers, the bomber jacket really fits my lifestyle. Here is Simplicity D0759 in wool with a Bemberg rayon lining. The blond-colored wool was 36/2, and the green is an interesting Japanese yarn with wool around a paper core (washes fine, I checked!) The draft is a great one from Sharon Alderman’s “Mastering Weave Structures,” page 113. I am now a convert to Bemberg lining fabric!
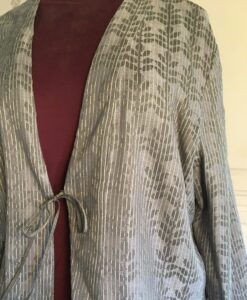
 I made the bomber again in the drawloom-created silk which was mentioned in my text to Maggie. I have found that the long, skinny raglan sleeve works well with the yardage I weave. Again, the Bemberg lining. A comfortable jacket which seems perfect for the drapey fabric.
I hope you will challenge yourself to cut a shapely jacket out of your next garment yardage! If you are like me, you’ll weave some extra for the inevitable need to troubleshoot, and enjoy the well-fitting result!